We all wish we had walk-in pantries and butler pantries like you see on those fabulous make-over shows, alas it is just not reality for me so here is how I make myself smile every time I open the kitchen cupboard pantry.
My pantry cupboard has been a mess since forever, a dumping ground, really. I blamed the spices because they were in different sized jars and containers and kept falling over, ugh. Also things got lost like in the Bermuda Triangle in there.
A little research and brainstorming with myself as well nothing else to do on a Saturday night these days (due to covid all restaurants and bars are still closed here), I bought 2 spice racks and 4 baskets and voila …. SMILE.
MY TIPS for a PERFECT pantry in a kitchen cupboard:
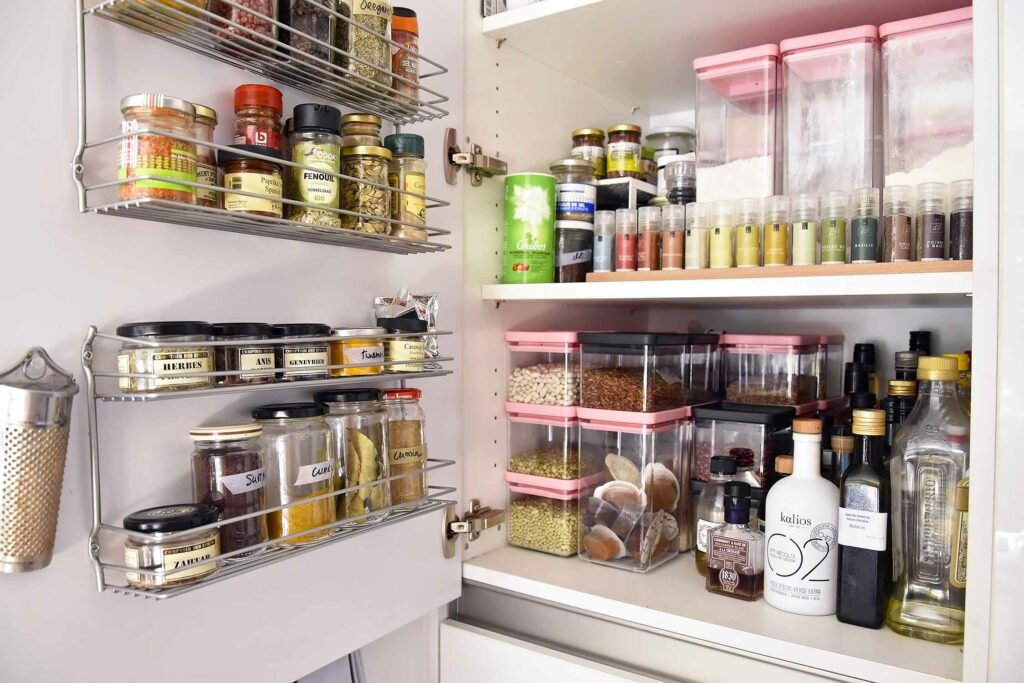
1. Mount on the inside of the cupboard on the door a couple of spice racks. This changed my life! I found these online somewhere, I wanted them to be 8 cm deep as it needed to house all the jars sizes I had. Don’t forget to account for the space in the cupboard it will require, it will push things back.
Always good to go through your spices and dried herbs every 6 months as they don’t go bad but will loose flavour.
2. Use square containers to maximise space. Place infant what you need and In the back and up top, in the not easy to reach part, place all the back stock, meaning half packets or extras stock. I don’t want to see the bags but you ve to store them somewhere. Now it is all in the same spot yet out of sight so I know where to check before going to the shops to get more.


3. Layer the levels with different type of jars or containers. I bought these pink and back lidded containers a few years ago and they hold all my different flours, grains, legumes, and stock. In this section I don’t use any of my reuse jars as these items come in bags of 1 or 2 kilo and need a proper container. Place the containers you need the most on the easy to reach shelves, in my case the flours can go higher up as I don’t bake much ( not sure why I ve 12 different types of flour).
4. Label everything as evidently you will not remember what it is what or mix them up with similar looking ingredients like curry and turmeric. ( yep that happened to me) I used some washi tape and a black marker but I might be looking for a label maker soon. Also I cut out the expiration dates of the packets and toss them in the container.
5. Make it easy for you! Choose the cupboard located near where you cook for easy reach. I ‘ve 3 short cupboards ( total of 5 shelves) I dedicated to pantry items: the one with the spice rack is at arms length to the right of the stove, the one with wire baskets is at arms length to left and then there is the tea cupboard on the other side of the kitchen located where the mugs are.
In my tea cupboard, as you can see, I use all kinds of tea containers and refill when needed. I just stick the cutout packet label on it for easy view.
What I love most is when I open the cupboard how the scent of tea envelops me and swoops me up.
I love to be able to see everything right away when I open the cupboard.


6. Another game changer for me is using wire baskets to group ingredients in a high up cupboard. Like here this cupboard is above my oven and microwave hence I can’t see what is all the way in the back without high heels or a stepladder. Very frustrating that’s how you end up with 4 packets of confectioners sugar!
Many a jar has crashed on the floor in 1000 pieces when trying to reach for something. Now the baskets are easy to remove and locate what I need. I have a basket with nuts and dried fruit, one for the seeds, cereals, crackers and cookies and on the shelve above for the cans, honeys and sugars.
Written and photographed by Sandra Slawinski without commercial deals. I bought all the spices, condiments and teas shown in the photos and I didn’t style the cupboards for the photos.